What At-Home Dermaplaning Actually Involves
At-home dermaplaning uses a single-blade razor to gently remove dead skin cells and fine vellus hair (peach fuzz) from your face. You hold the blade at a 45-degree angle and glide it across your skin in short, downward strokes. The process physically exfoliates your skin's surface while removing the fine hair that can trap oil and makeup. Unlike professional dermaplaning, which uses medical-grade surgical scalpels, at-home versions use gentler consumer blades designed for safety rather than aggressive exfoliation.
The tools available for home use are intentionally less sharp than professional instruments. This reduces your risk of cutting yourself but also limits how deeply you can exfoliate. Most at-home dermaplaning tools feature blade guards, smaller blade sizes, or slightly duller edges compared to what professionals use. Some are disposable single-use razors, while others have replaceable blade cartridges attached to reusable handles.
What at-home dermaplaning can do:
- Remove surface layer of dead skin cells for smoother texture
- Eliminate fine vellus hair that creates a fuzzy appearance
- Create a clean canvas for better makeup application
- Help skincare products absorb more effectively
- Provide gentle exfoliation for most skin types
- Give an immediate brightness boost to dull skin
What at-home dermaplaning cannot do:
- Match the depth of exfoliation from professional treatment
- Address deep acne scars or significant texture issues
- Remove thicker terminal hair (like eyebrow hair or hormonal facial hair)
- Provide the same level of precision and customization as trained professionals
- Last as long as professional results
The difference between DIY and professional treatment matters more than most people realize. Professional providers spend 20 to 40 minutes on the process using sharper blades and trained technique. They can exfoliate more thoroughly while minimizing risk through proper skin assessment and sterile protocols. At-home dermaplaning typically takes 5 to 15 minutes with less dramatic results.
This information is for educational purposes only and should not replace professional medical advice from qualified providers.
Best Tools for At-Home Dermaplaning
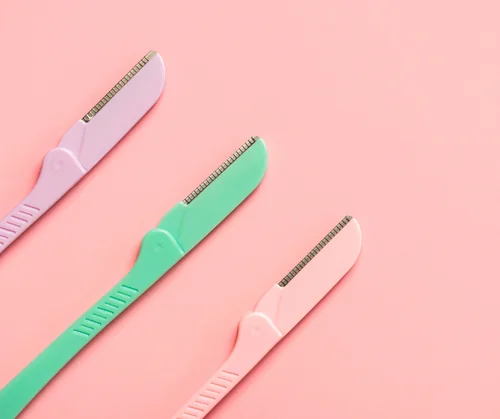
Single-blade facial razors (most popular): These look like small scalpels with protective guards. The blade sits at a fixed angle to the handle, making it easier to maintain the correct 45-degree position. Popular options include disposable razors designed specifically for facial dermaplaning. Prices range from $5 to $15 for multi-packs of disposable versions, or $15 to $30 for reusable handles with replacement blade cartridges.
Features to look for:
- Stainless steel surgical-grade blades (sharper and more durable than regular razor blades)
- Ergonomic handle with good grip to prevent slipping
- Blade guards to reduce risk of cuts
- Individual packaging for sterility
- Clearly marked as facial dermaplaning tools (not just eyebrow shapers)
Battery-powered dermaplaning devices: Some brands offer electric devices with oscillating or vibrating blades. These can feel safer for beginners because the blade movement is controlled mechanically. However, they often provide more of a hair removal experience than true exfoliation. Prices range from $20 to $60 for quality electric options.
What to avoid:
- Regular body razors with multiple blades (designed for different hair and skin)
- Eyebrow shapers marketed as dermaplaning tools (too small and not designed for full-face use)
- Tools without blade guards if you're a beginner
- Extremely cheap options with flimsy blades that bend or break
- Reusable blades without proper sterilization capability
The American Academy of Dermatology emphasizes using clean, high-quality tools for any at-home skin treatment to minimize infection and injury risk.
Best Oils to Use for At-Home Dermaplaning
Using oil during dermaplaning (sometimes called "oilplaning") creates a protective barrier that helps the blade glide smoothly while reducing friction and irritation. The oil lubricates your skin, making the process more comfortable and lowering your risk of nicks or redness.
Jojoba oil (best for most skin types): Jojoba closely mimics your skin's natural sebum, making it ideal for dermaplaning. It's lightweight, absorbs well, and works for oily, dry, combination, and normal skin types. Jojoba is non-comedogenic, meaning it won't clog pores or trigger breakouts. It contains vitamin E for antioxidant protection and helps balance oil production rather than adding excess greasiness.
Squalane oil (best for sensitive and acne-prone skin): Squalane is derived from olives or sugarcane and feels incredibly light on skin. It absorbs almost instantly without leaving residue, making it perfect for people who dislike greasy products. Squalane is non-comedogenic and gentle enough for even the most sensitive skin. It helps regulate oil production, supports skin barrier function, and provides deep hydration without weight.
Rosehip oil (best for anti-aging benefits): Rich in essential fatty acids and vitamins A and C, rosehip oil supports skin regeneration and repair. It's excellent for post-dermaplaning recovery because it helps heal any micro-trauma from the blade. Rosehip can improve the appearance of fine lines, scars, and uneven tone over time. It's lightweight enough for most skin types but may be too rich for very oily or acne-prone skin.
Argan oil (best for dry skin): Packed with vitamin E and omega fatty acids, argan oil provides deep moisture and helps soften dry patches. It's slightly heavier than jojoba or squalane but still absorbs well. Argan can help control sebum production in acne-prone skin while providing necessary hydration. It's anti-inflammatory, which helps reduce redness and irritation during and after dermaplaning.
Grapeseed oil (best for oily skin): Grapeseed oil is lightweight, fast-absorbing, and won't leave a greasy film. It's high in linoleic acid, which strengthens your skin's moisture barrier. Grapeseed has mild astringent properties that can help tighten and tone oily skin. It's non-comedogenic and generally well-tolerated by most skin types.
What to avoid:
- Coconut oil (highly comedogenic and can cause breakouts in many people)
- Heavily fragranced oils with essential oils (can irritate freshly exfoliated skin)
- Thick, viscous oils that don't absorb (like castor oil used alone)
- Any oil you haven't patch-tested first
- Mineral oil (can clog pores and doesn't provide skin benefits)
How much oil to use: Apply 3 to 5 drops of your chosen oil to clean, dry skin. Spread it evenly across the areas you plan to dermaplane. You want enough for the blade to glide smoothly but not so much that you can't see what you're doing. Start with less and add more if needed.
Step-by-Step At-Home Dermaplaning Technique
Preparation (5-10 minutes before): Cleanse your face thoroughly with a gentle, pH-balanced cleanser. Remove all makeup, sunscreen, oil, and debris. Pat your skin completely dry with a clean towel. Dermaplaning works best on dry skin, though some people prefer the "oilplaning" method using facial oil for extra glide and protection. If you're new to dermaplaning, oil can make the process feel safer and more comfortable.
Patch test your oil (24 hours before): If using oil, apply a few drops to your inner arm or behind your ear 24 hours before full-face dermaplaning. Wait to see if you develop any redness, itching, or irritation. This step is crucial for people with sensitive skin or allergies but smart for everyone.
Set up your space: Use a well-lit bathroom or vanity with a good mirror. Make sure you can see your entire face clearly. Wash your hands thoroughly. Have clean tissues or cotton pads nearby to wipe the blade between strokes. Keep your moisturizer and sunscreen within reach for post-treatment care.
Apply oil (if using): Dispense 3 to 5 drops of your chosen facial oil into your palm. Rub your hands together to warm it slightly, then press and smooth the oil across your forehead, cheeks, chin, and jawline. Use gentle pressing motions rather than rubbing to avoid moving the oil around unevenly.
Hold the blade correctly: Grip the dermaplaning tool firmly but not tightly. Your hand should feel secure and controlled. Position the blade against your skin at a 45-degree angle. This angle is crucial because going too flat won't exfoliate effectively, while going too steep increases cutting risk.
Use proper technique: Pull your skin taut with your free hand. This creates a flat, smooth surface for the blade to glide across. Use short, gentle, downward strokes in the direction of hair growth. Each stroke should be about 1 to 2 inches long. Apply very light pressure and let the blade's weight do most of the work. Never saw back and forth or go against the grain.
Work in sections systematically: Start at your forehead near your hairline. Work in small sections across your forehead, moving from one side to the other. Move down to your temples and upper cheeks. Continue to mid-cheeks, lower cheeks, and jawline. Carefully address your chin and around your mouth. Save delicate areas like the upper lip and around the nose for last, using extra caution.
Clean the blade frequently: After every few strokes, wipe the blade on a tissue or cotton pad to remove accumulated dead skin cells, hair, and oil. A clean blade works more effectively and reduces the risk of pushing debris back into your skin.
Know when to stop: Don't go over the same area more than twice. Over-dermaplaning can irritate skin and cause redness or sensitivity. If you miss a spot, you can address it during your next session rather than risking irritation.
What to skip: Never dermaplane over active breakouts, open wounds, irritated skin, or areas with thick terminal hair. Avoid the delicate skin around your eyes. Don't dermaplane your eyebrows unless you're experienced and extremely careful. Skip dermaplaning if you have sunburn, eczema flares, rosacea outbreaks, or any active skin infections.
Post-Dermaplaning Care and Recovery
Immediate aftercare: Rinse your face with cool water to remove remaining oil and debris. Pat dry gently and apply a hydrating serum with hyaluronic acid to help freshly exfoliated skin retain moisture. Follow with a gentle, fragrance-free moisturizer. If it's daytime, finish with broad-spectrum SPF 30 or higher.
First 24-48 hours: Your skin may look slightly pink or feel sensitive, which is normal and should fade within hours. Keep hands off your face to avoid bacteria. Skip makeup for 24 hours if possible. Use only gentle, fragrance-free cleansers.
Avoid for 3-5 days: Skip chemical exfoliants (AHAs, BHAs, glycolic acid), retinoids, prescription acne medications, vitamin C serums, hot showers, saunas, steam rooms, and intense workouts that cause heavy sweating.
Sun protection (critical): Freshly dermaplaned skin is more vulnerable to UV damage. Apply SPF 30 or higher daily, even indoors. Reapply every two hours in direct sunlight. Wear a wide-brimmed hat outside and avoid prolonged sun exposure during peak UV hours.
Resuming actives: Wait at least 3 days before reintroducing chemical exfoliants and 5 days for prescription retinoids. Start with gentlest products first, introducing one at a time.
Maintenance frequency: Dermaplane every 3 to 4 weeks, allowing skin to regenerate between sessions. More frequent treatments can damage your skin barrier.
Safety Risks and How to Minimize Them
Risk: Cuts and nicks Even with blade guards, you can nick yourself if you use too much pressure, hold the blade at the wrong angle, or rush the process. Cuts introduce infection risk and can leave small scars. To minimize this risk, always pull skin taut, use light pressure, work slowly and deliberately, maintain the proper 45-degree angle, and never dermaplane when tired, distracted, or rushed.
Risk: Skin irritation and redness Dermaplaning temporarily removes your skin's protective outer layer, making it more sensitive. Excessive irritation can lead to inflammation, redness, and discomfort. Minimize this by starting with less frequent treatments (once a month), using very light pressure, choosing gentle, non-irritating oils, and avoiding dermaplaning over any irritated areas.
Risk: Breakouts and infection Introducing bacteria to freshly exfoliated skin can cause breakouts or infections. Dirty tools, touching your face with unwashed hands, or applying contaminated products can all trigger problems. Prevent this by always using clean, sterile blades, washing your hands before touching your face, avoiding dermaplaning over active acne, cleaning tools thoroughly after each use, and not sharing dermaplaning tools with anyone.
Risk: Over-exfoliation Dermaplaning too frequently or combining it with other aggressive treatments can damage your skin barrier. This leads to chronic sensitivity, increased breakouts, and compromised skin health. Avoid this by limiting dermaplaning to once every 3-4 weeks, not combining it with other exfoliation on the same day, watching for signs of barrier damage (persistent redness, increased sensitivity, more breakouts), and giving your skin recovery time between treatments.
Risk: Uneven results Without professional training, you might exfoliate some areas more than others, creating uneven texture. This is cosmetic rather than dangerous but frustrating. Improve results by working in small, systematic sections, using consistent pressure and angle throughout, taking your time rather than rushing, and practicing technique on less visible areas first.
Who should avoid at-home dermaplaning entirely:
- People with active acne or frequent breakouts (dermaplaning can spread bacteria)
- Anyone with inflammatory skin conditions like eczema, psoriasis, or rosacea
- Those using isotretinoin (wait 6 months after stopping before dermaplaning)
- People with very thin, sensitive skin or visible broken capillaries
- Anyone with active cold sores or herpes simplex outbreaks
- Those with excessive terminal hair growth from hormonal conditions
- Anyone currently using prescription retinoids (stop 1 week before dermaplaning)
At-Home vs. Professional Dermaplaning Comparison
Tool quality and sharpness: Professional providers use medical-grade surgical scalpels (#10 or #14 blades) designed for precision skin work. These blades are significantly sharper than consumer tools and can exfoliate more deeply. At-home tools use gentler blades with safety features that reduce cutting risk but also limit exfoliation depth. The difference in blade quality directly affects how much dead skin you can remove and how smooth results feel.
Technique and precision: Licensed professionals receive specific training in dermaplaning technique, angle, pressure, and safety. They can assess your skin condition and adjust their approach accordingly. They work systematically and thoroughly across your entire face and often extend to the neck. At-home users, even with careful technique, can't match this level of precision or consistency, especially around delicate areas like the nose and upper lip.
Treatment time and coverage: Professional sessions typically last 20 to 40 minutes and cover every area of your face methodically. The provider takes time to work carefully and thoroughly. At-home dermaplaning usually takes 5 to 15 minutes and may miss areas or provide inconsistent coverage, especially for beginners who are nervous about certain zones.
Results and longevity: Professional dermaplaning provides more dramatic, longer-lasting results. You'll notice a significant difference in smoothness, brightness, and overall skin texture that lasts 3 to 4 weeks. At-home results are subtler and may fade within 2 weeks as dead skin cells accumulate and vellus hair regrows. The depth of exfoliation achieved professionally simply can't be replicated safely at home.
Safety and sterility: Professional environments maintain strict sterilization protocols, use single-use blades, and follow health department regulations. Providers can identify contraindications and avoid dermaplaning when it's not safe. At-home settings can't match this level of sterility or professional assessment, increasing risk of infection or complications.
Cost comparison: Professional dermaplaning costs $100 to $250 per session, depending on location and provider. Getting treatments monthly runs $1,200 to $3,000 annually. At-home tools cost $5 to $30 for initial purchase, with replacement blades running $5 to $15 per pack. Annual at-home cost is approximately $60 to $150 for tools and replacement blades, plus $30 to $80 for facial oil.
Best approach for most people: Use professional dermaplaning every 4 to 8 weeks for deeper exfoliation and optimal results. Supplement with careful at-home dermaplaning in between professional sessions to maintain smoothness and extend results. This hybrid approach balances cost considerations with result quality and safety.
Common Mistakes to Avoid
Using too much pressure: The blade's sharp edge does the work, so you only need light, consistent contact. Pressing hard increases cutting risk and causes irritation.
Going over areas repeatedly: Two passes maximum per area prevents irritation and skin damage. Accept that perfection won't happen in one session.
Dermaplaning too frequently: Wait 3 to 4 weeks between sessions. More frequent treatments damage your skin barrier and cause chronic irritation.
Wrong angle: Maintain a proper 45-degree angle. Too flat won't exfoliate effectively; too steep increases cutting risk.
Not pulling skin taut: Always use your free hand to stretch the area you're working on, creating a flat, smooth surface for the blade.
Dermaplaning over breakouts: This spreads bacteria and worsens inflammation. Always work around active blemishes.
Skipping sunscreen: UV exposure on freshly exfoliated skin can cause hyperpigmentation. Apply SPF 30+ daily without exception.
Dermaplaning vs. Shaving: Understanding the Difference
While both involve running a blade across your face, dermaplaning and regular shaving serve different purposes and use different techniques. Regular shaving focuses solely on hair removal, using quick strokes with multi-blade razors designed to cut hair at the skin's surface. The process typically involves shaving cream or gel and doesn't emphasize exfoliation.
Dermaplaning is an exfoliation treatment that removes dead skin cells as its primary goal, with vellus hair removal as a secondary benefit. It uses single-blade surgical razors held at specific angles with controlled pressure. The technique is slower, more methodical, and focused on skin texture improvement rather than just hair removal.
The tools differ significantly. Regular razors have multiple blades stacked together, often with moisture strips and flexible heads designed for body contours. Dermaplaning tools have a single, flat blade at a fixed angle, designed for facial skin exfoliation. For a detailed comparison of these methods and when to choose each, check out dermaplaning vs. shaving.
Realistic Expectations for At-Home Results
What you'll notice immediately: Your skin feels noticeably smoother to the touch right after dermaplaning. Makeup applies more evenly because you've removed the fine hair and dead cell buildup. Your face looks brighter and more radiant as fresh skin cells are revealed. Products like serums and moisturizers seem to absorb better.
What develops over days: For the first few days, your skin maintains its ultra-smooth texture. You might notice your pores look smaller because they're clearer of debris. Some people experience slight redness or sensitivity for 24 to 48 hours, which is normal.
What happens over weeks: Dead skin cells begin accumulating again within 5 to 7 days, though you'll maintain better-than-baseline texture for 2 to 3 weeks. Vellus hair starts regrowing around day 10 to 14, feeling slightly different because the tips are blunt from being cut. By week 3 to 4, hair has regrown to near its original length and texture.
What won't change: At-home dermaplaning won't eliminate deep acne scars, significant wrinkles, or severe hyperpigmentation. It doesn't permanently remove hair or prevent aging. It won't transform problematic skin into perfect skin. The results are temporary and require ongoing maintenance to sustain.
Cumulative effects: With consistent monthly dermaplaning, you may notice gradually improved texture, fewer dry patches, and more even tone over several months. However, these cumulative benefits are subtle compared to professional treatments.
Understanding the full scope of dermaplaning benefits helps you appreciate both what home treatments can and cannot achieve.
When to See a Professional Instead
For your first dermaplaning experience: If you've never been dermaplaned before, consider getting your first treatment professionally. This lets you experience the sensation, see maximum results, and learn proper technique through observation. Many providers will explain their process if you mention you're interested in trying it at home.
For significant skin concerns: Deep acne scarring, severe hyperpigmentation, or pronounced texture issues require professional-grade exfoliation that at-home tools can't achieve. Professionals can also combine dermaplaning with other treatments like chemical peels for enhanced results.
If you have complex skin: Very sensitive skin, active rosacea, severe acne, or other inflammatory conditions need professional assessment before any exfoliation. A trained provider can determine if dermaplaning is appropriate and modify technique to minimize risk.
For special events: When you need guaranteed, dramatic results for a wedding, photoshoot, or important event, professional dermaplaning provides more reliable outcomes. You don't want to risk irritation, breakouts, or uneven results from at-home treatment right before a big day.
If at-home attempts aren't working: Some people simply can't achieve satisfactory results at home due to hand coordination, vision limitations, or anxiety about using blades on their face. There's no shame in acknowledging that professional treatment works better for you.